Level 2 training and user policies
Any level-1 user who wishes to operate the MRI scanner must become a Level 2 Operator. These personnel are extensively trained and educated in the broader aspects of MR safety issues. After completing a comprehensive training program and passing an exam, these users are certified to conduct the MRI machine without a technologist. After 9 months of inactivity at ToNI, a refresher course is required to maintain Level 2 Operator status. Level 2 Operator status may be revoked at any time. Level 2 Operator training is split into two sections. The first half of the level-2 training will be via online resources to get the trainees familiar with different aspects of MRI. They can go through the following topics at their own pace:
- https://drive.google.com/file/d/1WcuNIhtMCFBV3p7nYPuqHklhLTqYtHa7/view?usp=sharing
- https://pep.siemens-info.com/en-us/mr-safety-introduction
- https://pep.siemens-info.com/en-us/mr-safety-preface
- https://pep.siemens-info.com/en-us/mr-safety-prescreening
- https://pep.siemens-info.com/en-us/mr-safety-patientexamination
- https://pep.siemens-info.com/en-us/mr-safety-emergency
An operator manual for the scanner will also be provided.
The second half involves hands-on training. This includes the following: - A minimum of three Phantom Scan Sessions with technologist (one-on-one sessions). These sessions are usually 1.5-2 hours long. - A minimum of five shadowing sessions with technologist or another level-2 operator - Dedicated Hands-On Training Sessions running the scanner under supervision (minimum of seven sessions) - Hands-on exam: Users should demonstrate that they can run scan sessions with no supervision before attaining the full level-2 status. They should be competent at screening participants, gathering implant information, handling emergency situations, planning MRI sequences and data transfer.
Additional hands-on training sessions can be offered based on the user’s needs.
General scanning procedures
Booking
Consenting
Screening
Screen anyone entering Zone 3. Verbal screening will suffice for entry to zone 3.
Screening forms + verbal screening should be completed by anyone wishing to enter Zone 4.
Remove all metal before entering MRI room (check hair for bobby pins, clips, etc. No jewelry that is not non-ferromagnetic should be worn by the those entering the room (ex: gold, silver, stainless steel), empty pockets.
Pre-session prep
Experiment PC - Turn on the BOLD screen - Make sure mirroring is ON - Turn on eye tracker PC
Console Table - DO NOT place any binders or other heavy objects near the intercom scan stop button - NO LIQUIDS on the MRI console table
Positioning
Positioning the participant - Give hair net and earplugs - Audio buds if the study has auditory stimulus - Position the head straight (no tilt) and pads placed on either side to prevent motion - Slight tilt is needed for eye tracking Knee cushion to maximize comfort - Instruct participants not to cross their arms/legs - Give response box and emergency ball - Padding as needed (ex: under elbow, neck, etc.) - Set up physio monitoring devices (if applicable) - Plug the anterior coil and attach the mirror - Laser to align with the coil landmark (if head position is very different from the usual set up, laser on nasion) - Ensure that the participant is comfortable before leaving the room
Registering a participant
Registration - Last name & Pt ID: Project ID_Subject ID_YYYYMMDD - All orange fields are mandatory - Participant weight for accurate SAR calculation - Select the right protocol
Scanning
Planning - Check scan notes for the prescription - DO NOT change any parameters - Check coils & phase encoding direction before starting the sequence - Check for motion/signal quality after each sequence using MR View&Go - Inform the level-1 user if motion artifact is noticed and remind the participant to hold still - Export the data at the end of the session - Physio data (should only be exported by authorized users)
Scanner errors - Check the error messages on the screen and follow the instructions - If the error is not resolving after a full shutdown, call Siemens
Emergency Procedures - Stop the scan and take the participant out of the scanner immediately in case of an emergency - MRI compatible wheelchair can be used if needed - Manually release and lower the table if there is power failure - Reset the table if the ‘table stop’ button has been pushed
Other Reminders - Lock the MRI door whenever leaving the area (push the door to make sure it’s locked) and store the key in the lock box
Incidental findings check: Either during the scan session or after the session has completed, the level 2 user must check a high-resolution anatomical image (e.g., T1-weighted MPRAGE) for potential incidental findings. See below for more details.
Post-session clean up - Scanner room: - Control room:
Data transfer to echo 1. Transfer all data to echo 2. Ensure that all files were successfully transferred by... (is there a standard method that is used for this? e.g., looking at number of files and total file size on disk? Or perhaps the control computer notes if there are errors in transfer?)
Incidental findings
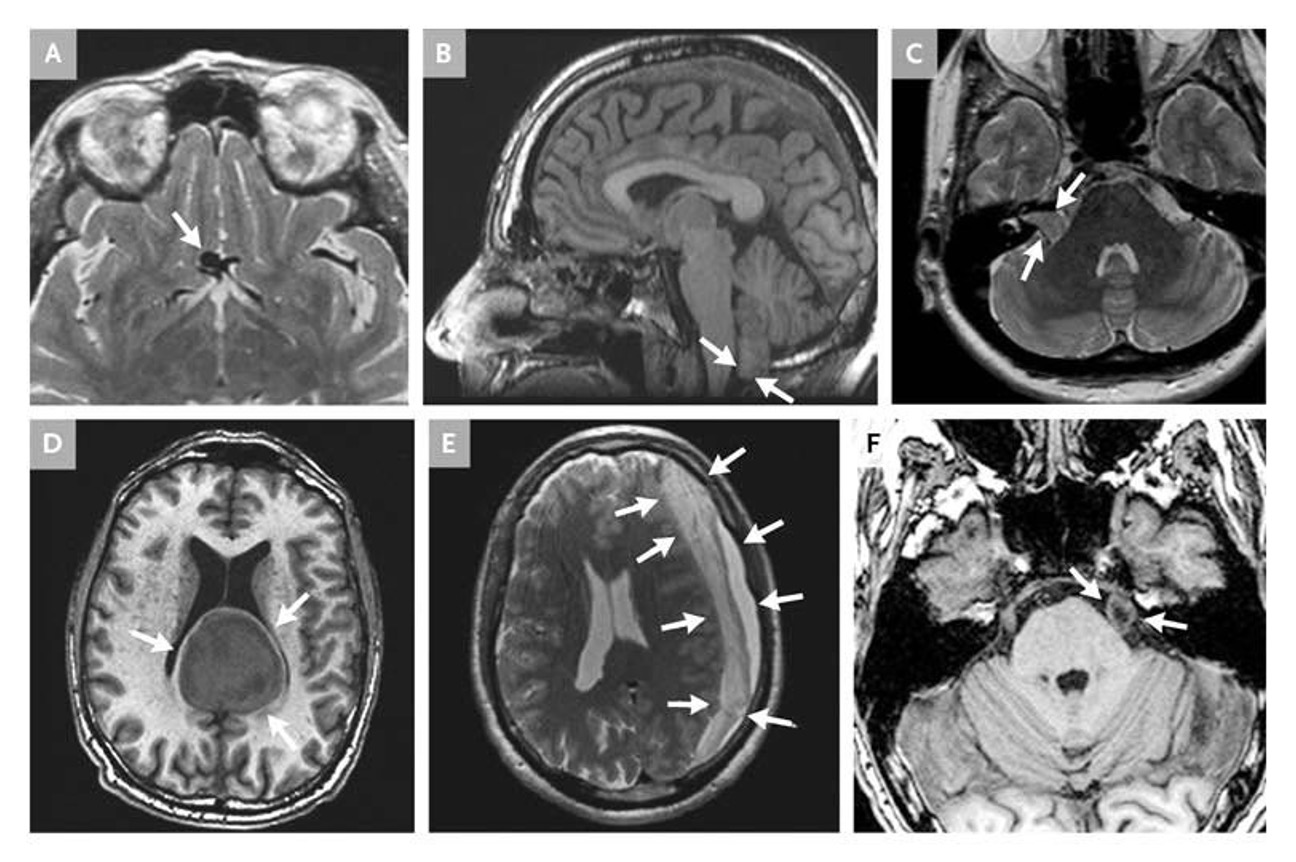
Incidental findings are unexpected abnormalities with potential clinical significnace that are discovered during an MRI session and occur relatively frequently. For example, a review of the ABCD dataset found 21% of participants had incidental findings, 4% of which led to a clinical referral (Li et al., 2021). At ToNI, our policy is that level 2 users assume the responsibility of checking for and reporting potential incidential findings for any scan session they are running. This includes sessions for their own projects and sessions they are running for other projects.
How to check for incidental findings
Incidental findings require a careful check of anatomy. Some incidental findings are obvious and others are subtle (see examples below noted with white arrows). To perform a check, first look for gross anatomical abnormalities (e.g., panels D & E below). Then, carefully step through the entire brain along one axis looking for notable asymmetries in structure.
Incidental findings reporting
If you find a potential incidental finding, please email psy.mri.physicist@utoronto.ca with the subject line: "ToNI incidental finding report" and include the study information (i.e., study name, participant ID number, and date) and the image series number containing the potential incidental findings.
Control computer disk usage
The control computer has limited disk space for holding recently collected data. The data policy at ToNI is that after data from a scan session has been successfully tranferred to echo, ==the data on the control computer will remain for 14 days, after which it can be deleted==. In this 14 day window, it is the responsibility of each project's users to confirm that the data transferred to echo is complete and without errors.